SnoUI
 VS Code
 Python
A Python library for building tool UIs inside Snowdrop without writing verbose PySide boilerplate. Originally developed during The Division: Heartland and used across multiple Snowdrop titles including XDefiant.
The Problem
Most pipeline scripts need the same thing: a handful of inputs, a button, and something happens. But writing that in raw PySide means dozens of lines of widget instantiation, layout management, and signal wiring before you've written a single line of actual tool logic. The UI ends up overwhelming the code it exists to serve.
The Solution
SnoUI flips the model. You describe your UI in a YAML string — just the fields you need, nothing else — and SnoUI builds it. State management follows a React-style get_state / set_state pattern, and buttons are wired to tool functions with a single connect() call. The result is that your tool logic stays front and center, and the UI is just a short block of markup above it.
YAML was a deliberate choice: it's minimal, human-readable, supports arrays natively, and has almost no syntax to learn. The goal was zero barrier to adoption for pipeline TDs who just need to ship a tool.
Define it, connect it, run it:
my_cool_radio:
    type: radio
    value: [A, B, See, Dee]
    label: Radio Group
div1:
    type: divider
label:
    type: label
    label: This is a label
my_cool_dropdown:
    type: dropdown
    label: Dropdown
    value: ['Item1', 'Item2']
my_cool_button:
    type: button
    label: Joined To Next
    join: True
Full Example
The example below covers the full feature set — state management, visibility toggling, custom components, collapsible sections, and the debug pattern for testing tool logic without rendering the UI.
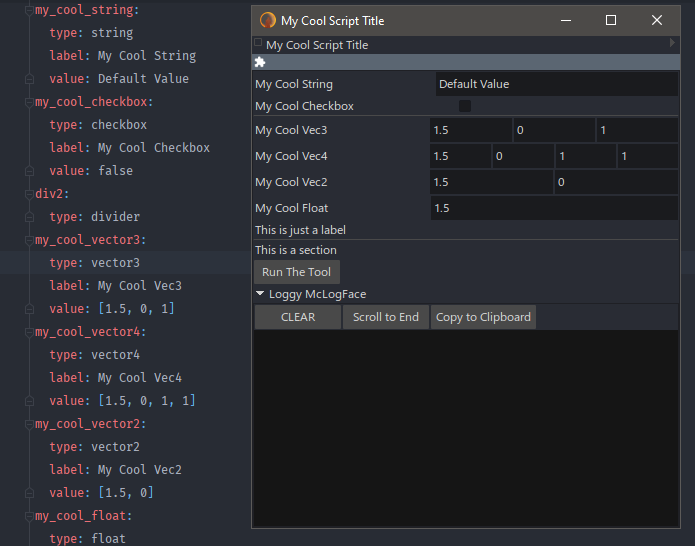
"""
This example demonstrates how to render all the UI elements available:

Writing the UI separately from the tool code helps keep things about
the tool not the ui.
"""
import random
from datetime import datetime
from random import randint, shuffle
from typing import Optional

from python3.code_generation.generated_classes import SRSX_FMWidgetTransferBox
from python3.utilities.snoui import SnoUI, SnoUIComponent
from python3.utilities.snoui.utils import label
from python3.utilities.ui_utilities import create_collapsible_frame
from sdvectormath import Matrix44


def my_cool_random_value_tool(ui: SnoUI, signal_name, context):
    """
    This function is bound in the my_example_ui function with connect('my_cool_random_button', my_cool_random_button)
    This button just causes the ui to set a bunch of random values to illustrate how to set state
    Make sure to have ui be an argument in your function! The : SnoUI bit after the arg is a nice way to get
    autocomplete for all the methods you can use with snoui
    :param ui: The current SnoUI instance
    :param signal_name: The name of the signal that triggered this function
    :param context: A context Dict that is populated with some data like 'name' which is the name of the calling
    component (What is defined in yml)
    :return:
    """
    # We can key things off the signal name
    print(signal_name)
    # Data about how this signal was called will exist in this dict
    print(context)

    # This field is parsed so it allows math expressions
    ui.log(ui.get_state('my_cool_vec3s'))

    # we can use data components to just store arbitrary data values
    # here we just log the default then set it to something else
    # and then log the changed value
    ui.log(ui.get_state('my_data_component'))
    ui.set_state('my_data_component', {'a dict key': 'some dict val'})
    ui.log(ui.get_state('my_data_component'))

    def randint_array(num):
        return [randint(0, 100) for _ in range(num)]

    def shuffle_and_return(_list):
        _l = _list
        shuffle(_l)
        return _l

    ui.set_state(
        "my_cool_mat44",
        Matrix44(
            randint_array(4), randint_array(4), randint_array(4), randint_array(4)
        ),
    )
    ui.set_state("my_cool_string", "Random Values")
    ui.set_state("my_cool_checkbox", False)
    ui.set_state("my_cool_vector3", randint_array(3))
    ui.set_state("my_cool_vector4", randint_array(4))
    ui.set_state("my_cool_vector2", randint_array(2))
    ui.set_state("my_cool_float", randint(0, 100))
    ui.set_state("my_cool_slider", randint(0, 10))
    ui.set_state(
        "my_cool_dropdown", shuffle_and_return(ui.get_state("my_cool_dropdown"))
    )

    # Sometimes we need to manually save the state to the database because it isn't called on any form events except
    # when we explicitly get or set state through the middleware triggered by our tool function.
    # Only works if you add persist_key='some-key'
    # ui.persist()


def my_cool_tool(ui: SnoUI, signal_name):
    """
    This is more of the tool code you're writing the UI for it is important, and we should focus our attention
    here rather than writing verbose faceman/pyside code That's why it's usually good practice to put the business logic
    up at the top of the file
    """
    # Fetch a value from the ui
    a_string_val = ui.get_state("my_cool_string")
    # If you have a log component in your ui these will show up there
    ui.logger.add_error(a_string_val)
    # We can also set the state of a ui component for things like clearing or defaulting values
    ui.set_state(
        "my_cool_string", f"State Set: {datetime.now()}! Signal Name: {signal_name}"
    )
    ui.set_state('my_progress', random.random())
    ui.set_state(
        'my_nested_comp_a', f"State Set: {datetime.now()}! Signal Name: {signal_name}"
    )
    ui.set_state('my_nested_comp_b', random.random())
    # Log a value
    ui.log(ui.get_state("my_cool_mat44"))
    ui.log(ui.get_state("my_nested_comp_a"))


def handle_ui_update(ui: SnoUI, signal_name, context):
    """
    We can handle visibility toggles here based on UI state

    :param ui:
    :param signal_name:
    :param context:
    :return:
    """
    # We can create little one off state objects like this to use just like react.useState(initialState)
    # use_state returns a tuple of (value, setter)
    [viz_a, set_viz_a] = ui.use_state(True)
    [viz_b, set_viz_b] = ui.use_state(False)

    # Check the name of the component that triggered this signal to be emitted
    # This lets you wrap multiple logic paths in one function
    if context.get('name') == 'my_cool_viz_toggle_button':
        ui.set_visible('my_cool_vec3s', set_viz_a(not viz_a))

    if context.get('name') == 'my_cool_viz_toggle_button2':
        ui.set_visible('my_cool_string_2', set_viz_b(not viz_b))


class CustomComponent(SnoUIComponent):
    """
    We can use a custom component for times when we need something more advanced.
    Just create it wrap it in a hbox or vbox and use it by name in the yaml below
    """

    # You always need to override build() at least.
    def build(self) -> SRSX_FMWidgetTransferBox:
        # Create the faceman component
        contents = []
        t = label(self.kwargs.get("value"))
        contents.append(t)
        # Add the widget to the widget dict this is used for visibility
        self.widgets['label'] = t.get_widget()

        # Can also set it as an attribute on the class
        self.label_widget = self.widgets['label']

        collapsible_t, w = create_collapsible_frame(contents, self.kwargs.get("label"))
        # return the TransferBox or wrapper transfer box
        return collapsible_t

    # if we'd like to get and set state we also need to define those with the correct args
    def get_state(self) -> Optional[bool]:
        # we can use the attribute here we set
        return self.label_widget.get_text()

    def set_state(self, state: bool) -> None:
        # or use the widgets dict
        self.widgets['label'].set_text(state)


def my_example_ui():
    """
    This is the main function we run that builds and shows the ui
    We define how our ui looks in yaml
    Then connect our tool code functions
    """
    # This is the actual UI layout yml code that describes our entire ui
    #  This could also be a python dict
    ui_text = """
my_cool_radio:
    type: radio
    value: [A, B, See, Dee]
    label: Radio Group
my_cool_mat44:
    type: matrix44
    label: My Cool Matrix44
    value: [[1,2,3,4],[5,6,7,8],[9,10,11,12],[13,14,15,16]]
my_cool_string:
    type: string
    label: My Cool String
    value: Default Value
my_cool_checkbox:
    type: checkbox
    label: My Cool Checkbox
    value: false
div2:
    type: divider
my_cool_vector3:
    type: vector3
    label: My Cool Vec3
    value: [1.5, 0, 1]
my_cool_vector4:
    type: vector4
    label: My Cool Vec4
    value: [1.5, 0, 1, 1]
my_cool_vector2:
    type: vector2
    label: My Cool Vec2
    value: [1.5, 0]
my_cool_float:
    type: float
    label: My Cool Float
    value: 1.5
my_cool_label:
    type: label
    label: Label For Slider Joined
    join: True
my_cool_slider:
    type: slider
    min: 0
    max: 10
    step: .5
    value: 5
div1:
    type: divider
label:
    type: label
    label: This is a label
my_cool_dropdown:
    type: dropdown
    label: Dropdown
    value: ['Item1', 'Item2']
my_cool_button:
    type: button
    label: Joined To Next
    join: True
my_cool_random_button:
    type: button
    label: Random Values
    join: True
my_cool_viz_toggle_button:
    type: button
    label: I Toggle Visibility
    join: true
my_cool_viz_toggle_button2:
    type: button
    label: I Also Toggle Visibility
my_cool_vec3s:
    type: vector3s
    label: Vector3 String
    value: [a, b, c]
my_cool_string_2:
    type: string
    label: A String That Shows up
    value: I just showed up!
    visible: False
my_progress:
    type: progress
my_custom_component:
    type: my_custom_component
    label: Custom Component
    value: [1,2,3]
my_data_component:
    type: data
    value: whatever you want
my_collapsible:
    type: collapsible
    label: Collapsible 1
    children:
        my_nested_comp_a:
            type: string
            label: String Component A
            value: A String Component A
        my_nested_comp_b:
            type: float
            label: Float Component B
            value: 1.0
my_collapsible2:
    type: collapsible
    label: Collapsible 2
    children:
        my_nested_comp_c:
            type: string
            label: String Component C
            value: A String Component C
        my_nested_comp_d:
            type: float
            label: Float Component D
            value: 1.0
"""
    # First we instantiate the ui
    ui = SnoUI(
        "My Cool Script Title",
        ui_text,
        log=True,  # adding log=True is usually a good idea
        # Add in a dict with the type of the component and the Class Reference to add custom components
        components={'my_custom_component': CustomComponent},
        # persist_key="example-snoui:2.0.4",  # Optionally enable persistence with a unique persist key
    )

    # Then each button can be 'connected' like this by name to a function
    # When the function is connected it will have the ui instance above passed in to it for you
    ui.connect("my_cool_button", my_cool_tool)
    ui.connect("my_cool_random_button", my_cool_random_value_tool)
    ui.connect("my_cool_viz_toggle_button", handle_ui_update)
    ui.connect("my_cool_viz_toggle_button2", handle_ui_update)

    # Finally show the UI
    ui.render()  # Comment me out to debug

    # DEBUG HOW TO
    #  If we are working on a script and we need to run it using the same inputs to test, it is much easier to
    #  Comment out the ui.render() function above then explicitly set the state manually and then
    #  call the tool code function needed passing in the SnoUI instance

    # Uncomment below to debug
    # ui.set_state('my_cool_vector4', [1, 2, 3, 4])
    # ui.set_state('my_cool_vector2', [1, 2])
    # my_cool_tool(ui)


# To kick the whole thing off we run the function that calls ui.render()
my_example_ui()